
Build a PDF Converter Using Microsoft Power Apps
It's a pretty common thing for business to need to convert documents into the PDF format for a variety of different reasons. We decided to build a power app and make it available for everyone!
Step One: Build a PowerApp
The first step in the process is to build the front end PowerApp, which our users will interact with to convert the files. You can make this as complex as you like – for example, you could integrate other core business processes into this one app if you wanted – however we are simply going to build in a process to convert files into PDFs:
Get the Attachment Control
It's a slight bugbear of this app developer that Microsoft don't make the attachment control a default option available from the insert menu. However, frustrating as this is, it isn't there. So you have to go and find it…
In your power app, add the “Edit Form” control, which will bring in a blank form control to your app:
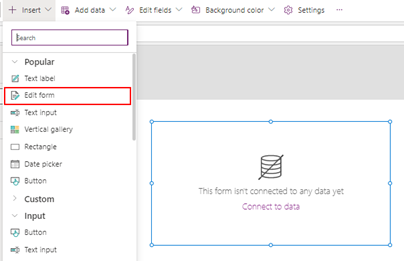
From there, you need to connect to a datasource that enables attachments – probably the best option would be a SharePoint list in this instance.
If you connect the form up to a SharePoint list, the values in the list should be returned along with the attachment control – its that part which we're interested in grabbing!
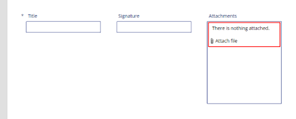
If you click on the attachments section, first thing you'll notice is that it appears with a little padlock on it.
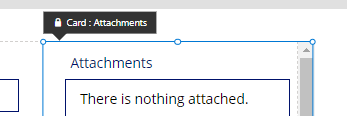
We need to unlock this before we can get access to it, so once the attachment is selected, go to the advanced properties section and click on the padlock symbol there:
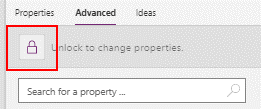
This unlocks the control, at which point we can copy it and paste it outside of the form control. Once you've done that, delete the form control because we no longer need it.
You'll also note that there are some errors on the control – indicated with a little red cross in the top left. Click on the dropdown and go to edit, which will show you were the error is – clear all the errors (there will be a few) because they relate to the form control that the attachment control was previously embedded within:
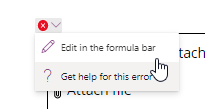
Once we manage to grab the attachment control, we then add the following:
- OnAddFile
- ClearCollect(attachCollection, AttachmentControl.Attachments)
- This simply creates a collection of the contents of the attachment control every time we add something. In this way, we can reference the collection at later points in the app rather than the control should we need to do anything with it.
- OnRemoveFile
- ClearCollect(attachCollection, AttachmentControl.Attachments)
- This is the same as the OnAdd property, however in this instance its when a file is removed.
- MaxAttachments
- Our process will work with multiple files, however in this instance we have limited the app to work with a maximum of 5 files.
Add a button to the app
Now that we can upload files to the application, we next need to add a button to the app to enable us to kick off the flow that will convert the file. Do this by adding a simple button from the insert menu.
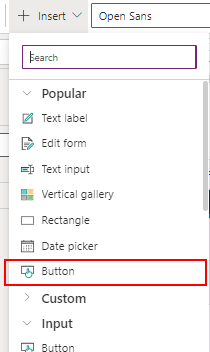
For the time being, we won't add any code to the button because we first need to build the flow…. But we'll come back to this point later!
Create a new flow
Go to the Power Automate option on the lift hand side and click on that, then click on Add Flow from the option below the search bar:
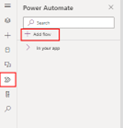
Then click on the Create new flow button and then create from blank. This will open a window from which you can build your app…. However I wouldn't recommend you build your app here.
Retitle the app from the top left corner, save it and then close the window. In a separate tab in your browser, open Power Automate and find the flow you just created, then edit it within Power Automate.
In this way you can test the app and the flow in different windows and will make developing the solution much easier!
Step Two: Build the Flow
This is the engine behind the app. We've made the decision to output the PDF's into a shared SharePoint folder, however you could choose to output it anywhere your users prefer. One thing to note though, if you wanted to give the users the ability to choose a location to save the file, PowerApps does not currently give you a file explorer control option!
Add the file content input
Firstly we need to get the flow to recognise the details we want to pass from the app. By default, creating the flow from the app (as we did in the above step) will have generated a flow with a PowerApps trigger. However, in this flow we want to use the V2 trigger, because this will enable us to state an input.
To do this, delete the trigger that is there and then search for the V2 trigger:
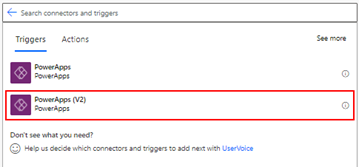
Once you have added the V2 trigger, you then need to add an input to the trigger. This will allow us to pass values from our power app into the flow with a nicely named value (the powerapp will recognise the input that the flow is requesting and return a clearly labelled input). Click on the add an input option and for this flow use the file option:

Name the input as you like, but we are going to use this to pass the content of the file we wish to convert, so we have called it “File Content”.

Re-create the file in OneDrive
Next up we need to create a copy of the file being passed from the powerapp back into another file. This does seem a little counter intuitive, because we are just replicating what we already have, however its necessary to have the file stored somewhere so that we can then convert it at a later stage.
The option we are looking for here is the create file option. We could use SharePoint to do this, however in this instance we are using the OneDrive connector because the documents being created will be localised to the user who is converting the file.
When you have added the create option, you need to add the file content and the file name. You want to pick these up from the file content that you added in step one… the content is simple, just select it from the dynamic content, however the name will require you to add a little bit of code: triggerBody()['file']['name']

Convert the file to PDF in OneDrive
Now that you have a copy of the file saved in your one drive, you can now convert this into a PDF using the OneDrive convert file part. All you need to do is provide the ID of the file (which can be taken from the previous create step) and what you want to convert it onto (i.e. PDF):

Create or Update File in a SharePoint location
Now that you have the file converted into the PDF format, you now need to save it somewhere. We have chosen to save it into SharePoint, however you could choose to save it into any location you choose. Our flow uses the SharePoint create file option – you just need to state where you want to put the file and pass in the file name and body from the previous step:
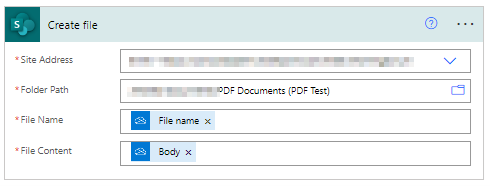
It's worth saying at this point that if the file already exists, the process will fail. If you want to avoid this, you'll need to put in a conditional branch that identifies whether file exists or not and if it does use an update process instead of a create.
Delete the file from OneDrive
Finally – we want to tidy up our OneDrive so that we don't have a load of files cluttering it up. To do that simply use a delete process to remove the file using the id from the create process above:

Step Three: Update the App and Test
Sounds a silly thing to write, but always and go back to check that the app is working in the way that you intend!
We have created the flow, now we need to update the button that we created a while ago.
Firstly, refresh the app so that it recognises all the changes that we have made to the flow. Once you've done that, select your button and on the OnSelect property, key in the name of the flow you added, followed by .Run( - if everything is working ok, you should see it ask for the input you created earlier:

You now need to pass the file content and name into the app from the collection that we created earlier so that the Flow has everything it needs to run.
Now, a collection can hold more than one record, so we need to handle that in the code that passes data to the flow. We do this by using what is known as a loop – so that means, apply the same process to everything in the collection.
The ForAll command allows us to perform this loop and the code we need to add to the button is as follows:
ForAll( attachCollection, 'PowerAppConverttoPDF-V2Method'.Run( { contentBytes: ThisRecord.Value, name: ThisRecord.Name } ) );
This is basically saying, for every item of the collection (called attachCollection), run the flow called 'PowerAppConverttoPDF-V2Method' and when you run that flow, pass the name and content (the ThisRecord parts) of the individual item in the collection.
Test!
You now should have everything set up to work…. So test it via the powerapp! Hopefully everything is working, but if not you'll need to investigate where its going wrong.
Share the flows!
Finally, you'll need to share the app and flow with everyone – we're going to push the app into teams, so we need to make sure people can access it before we do that! This is a really easy step to forget but if you do you'll get a load of complaints on day one!
Step Four: Package the App and Deploy to Teams
The final step in building our app is to deploy it for general consumption. To do that we are going to insert it into Teams as a side option and push it out to everyone in our company.
- Go to the apps section on PowerApps and click on the add to teams option:
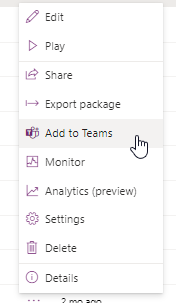
- From here, click on the download option – this will created a zipped package that you can then upload:

- Go the Teams admin center
- Go to the Teams Apps / Manage Apps, upload the zipped app you created
- Go to the Teams Apps / Setup Policies
- Add the app created to the list of apps in the global policy (assuming you want this rolled out to everyone!) – this should then push the app into everyone's teams side bar!


