
Power BI: How to Load and Combine Multiple Excel Files
It's a not so secret secret of the business world that Excel is king. Businesses big and small rely on the functionality it provides to manage all sort of aspects of their business, from Campaign Management through to Financial Planning and even Christmas parties!
The reason behind this is simple. It's incredibly flexible, simple to use and gives you access to powerful formulas. As an all-round business tool it's pretty much unbeatable which is why until AI takes over the work place, I guarantee you there will be a role for Excel.
Despite its brilliance though, it doesn't mean there aren't limitations. Analysing the data from multiple files can end up being a challenge. Instinctively we try to combine our datasets into one, however the net result of this can be an extremely large file that is difficult to navigate and maintain.
If you're encountering this problem and find part of your month is spent adding new sets of data to an ever increasing master file, one approach that we'd recommend is to use PowerBI to prepare your data and then use its visualisation capabilities to analyse it.
In this example we'll show you how easy it is to build a PowerBI dataset out of multiple excel files. It assumes that all the files being loaded are in the same format (i.e. all data in same columns), however its entirely possible to build in different transformations for different files.
1) Store the Files
Probably the most important tip here is to find a central place to save the files you want to load. As SharePoint experts, we would recommend using SharePoint as a storage location because it provides a shared location that can be accessed by approved users, however if the report is only for your use, a storage location on your own PC will work just as well.
2) Name the Files
When you store the files you want to load, consider using a naming convention for them that clearly identifies the content of the file. In this way, you'll then be able to slice or filter the data in PowerBI by the data files you have loaded. Once you've decided on the file names, update them and save them into the storage location you have decided upon.
3) Get the Data
Open PowerBI desktop and select on the Get Data option. This will allow you to navigate to the files you have just saved and choose that as the location to load. The options that you need here are either the “Folder” or “SharePoint Folder” because that will point to a folder of files rather than a single file:

Once you have chosen the folder to get your files from, PowerBI will present you with the following view of the data it is attempting to combine. You can simply select on the combine option here, however selecting on the transform data option will allow you to apply your own transformation (such as filtering unwanted data) to prepare your data:

4) Combine the Data
Once you have clicked on the transform option, you are then taken to the Power Query area of PowerBI. This is an extremely powerful visual transformation tool that allows you to convert and amend your data in lots of different ways. In this instance, all we're going to do though is click on the two little down arrows:

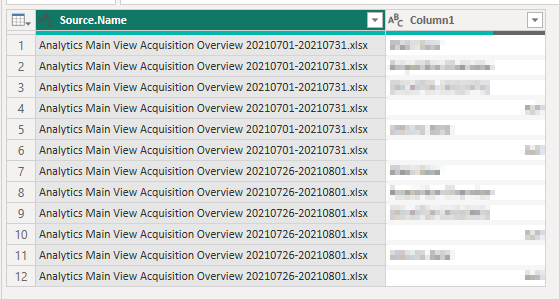
5) Transform the Data
As soon as you do this, all of the data from the files is loaded into one set of data! You don't need to do anything more now – the data is prepared and ready for use, all you need to do it load it.
However, it doesn't mean that you might not want to perform other clean-up activities that you have to do in your excel files. For example, converting dates would be a great candidate here as would splitting fields or implementing any conditional logic.
6) Apply the Data
Once you have made all the changes, simply click on the apply button and the data will load into your PowerBI datamodel, at which point you'll be able to analyse the data:
7) Repeat
The great thing about this is that the model will work the same way every time you click on the refresh option – any files that you add to the file location will just get picked up as part of the process and as long as they are in the same format (i.e. columns same order etc), then the data will get added to the analysis you've already performed!